Showing posts with label inspiratie. Show all posts

Friday, February 20, 2015

Where do I find inspiration?

(right-click to save the image or hover over the pin-button to pin it to Pinterest)

Inspiration, it's a beautiful word. It's always positive and it's something that enriches your life.
I've been thinking about from which places I get inspiration and I've written it down for you.

I get isnpired by many things and places.
I love to walk around Utrecht, especially the old part of the city. And every time I have to chose where to go, I look around an pick the street that looks most interesting or one I've never set foot in before. There's always things that surprise you or catch your eye. + Wandering around empties your mind and makes space for new thoughts.
The same ofcourse counts for other big cities, especially with an old historic part. Like Amsterdam, Den Haag, Haarlem and ofcourse London.
Oh, and always bring a notebook and pen with you to write down all amazing ideas that pop up into your head!
Or I walk around stores like IKEA, craft stores, the art & craft section of warehouses and stationery stores. I could wander around for hours. And in case of IKEA I treat myself to some Swedish meatballs after. Also very inspiring. :)
If I want to find inspiration closer to home, I browse through magazines (Flow Magazine is my favorite), a few of my favorite blogs or I scroll through Pinterest. About Pinterest, it's a great idea to see from who you repin most and then see who that person is following. That might lead you to a whole new source of ideas.

But some things are very important to keep in mind when you're looking for inspiration:
- Don't search for that one thing, be open minded
- Be relaxed, don't stress about it. Inspiration for whatever will find you at the right time and place
- And as you can see from the downloadable quote above: Sometimes not looking for inspiration is the best way to get inspired. Inspiration can and will strike you in any place you're not searching for it. Be prepared to be surprised.

Where do you look for inspiration? Share it in the comments below.

___________________________________________________

Inspiratie, wat een mooi woord. het is altijd positief en het is iets dat je leven verrijkt.
Ik heb nagedacht over waar ik mijn inspiratie vandaan haal en heb het allemaal opgeschreven.

Ik vind inspiratie in veel dingen en op allerlei plekken.
Ik vind het heerlijk om door Utrecht te lopen, vooral het oude gedeelte van de stad. En elke keer als ik moet kiezen waar ik heen ga, kijk ik om me heen en kies ik de straat die er het interessantst uitziet of eentje waarin ik nog nooit een stap gezet heb. Er is altijd wel iets wat je verrast of wat je aandacht trekt. + Rondstruinen maakt je hoofd leeg, zodat er ruimte is voor nieuwe gedachten.
Hetzelfde geldt natuurlijk voor andere grotere steden, vooral als ze een historisch gedeelte hebben. Zoals Amsterdam, Den Haag, Haarlem en natuurlijk Londen.
Oh, vergeet niet om altijd een notitieboekje en pen mee te nemen om je geniale ideeën in op te schrijven als ze in je brein opkomen!
Of ik loop door winkels als IKEA, craft stores, de creatieve afdeling van warenhuizen en boekhandels. Ik kan er uren rondhangen. En in het geval van IKEA trakteer ik mezelf daarna graag op een portie zweedse balletjes. Ook erg inspirerend. :)
Als ik op zoek ben naar inspiratie dichter bij huis, dan blader ik door tijdschriften (Flow Magazine is mijn favoriet), lees ik een paar van mijn favoriete blogs of scroll ik een tijdje door Pinterest heen. Over Pinterest gesproken, het is een goed idee om eens te kijken van wie je nou de meeste plaatjes repint en kijk dan wie deze persoon zelf volgt. Zo heb je heel veel bronnen met ideeën die je kunt aanboren.

Een aantal zaken zijn in het bijzonder belangrijk om in gedachten te houden als je op zoek bent naar inspiratie:
- Ga niet op zoek naar dat ene ding, houd je geest open
- Ontpan, ga niet lopen stressen. Inspiratie voor wat dan ook zal jou vinden op het juiste moment en de juiste plaats
- En zoals je in de quote hierboven kunt lezen: soms is het niet op zoek gaan naar inspiratie, de beste manier om inspiratie te vinden. Inspiratie kan en zal je vinden op elke plek waar je er niet naar zoekt. Wees bereid om verrast te worden.

Waar zoek jij naar inspiratie? Deel het in de reacties hieronder.

Thursday, February 12, 2015

10 Last-Minute DIY Valentine's Day Gifts

Oh NO! In two days time it's Valentine's Day already!
And I haven't got that one truly amazing gift to surprise my love with!

No worries, JCLN tot the rescue.
I've collected 10 not-too-difficult Valentine DIY gifts for you to make yourself.
They all come with instructions in the links below the image.


1. Light up my life by Design Sponge // 2. You are my perfect match by The 36th Avenue //
3. Yarn heart by Green Wedding Shoes // 4. Write a personal message around a picture. By Cute DIY Projects (no instructions, sorry) // 5. 12 months of pre-planned date nights by The Thinking Closet // 6. Heart wrapped vase by The Pretty Bee // 7. Pop up Pixelated Valentine's card by Minie Co // 8. Baby Rose sugar scrub by Smart School House // 9. Heart wrapped decoration by Molly Moo Crafts // 10. Secret message in a bottle by Cammille Styles.

Happy Valentine's Day!

________________________________________________________

Oh nee! Over twee dagen is het al Valentijnsdag!
En ik heb nog niet dat ene fantastische cadeautje om m'n lief mee te verrassen!

Geen zorgen. JCLN to the rescue!
Ik heb 10 niet te moeilijk Valentijns DIY verzameld, zodat je makkelijk zelf een uniek cadeau kan maken.
Overal zit een uitleg bij in de links onder het plaatje.
Fijne Valentijnsdag!

Thursday, January 15, 2015

5 Ways to use Crocheted Hearts for Valentine


Love, sweet gifts and a little extra attention to you loved ones. That's what Valentine's Day is about.
And to help you make Valentine's Day extra special this year, I've created an item that I think everyone can use.
I've made sets of 6 crocheted hearts, three 3D hearts and 3 flat hearts. And today I'll show you 5 different ways how you can use them.
If you like the hearts, you can get them here. But be quick, there's only one set of each color!

Here's 5 ways you can surprises your loved one (or yourself) with these cute hearts:

 1. Decorate the room with the hearts. Add some candles or flowers and success is guaranteed.

 2. Make your own card and glue a crocheted heart to it. You can easily do this with regular craft glue or super glue.

 3. Give the hearts away. One for your mom and one for your best friend. Or maybe put one in the jacket of your secret lover!

 4. Set out a trail in the house for your lover to follow. And at the end, there's you with a rose. I'm sure it will bring a smile and glow to the face of your true love.

5. Put one of the hearts on a necklace, pack it in a little box and wrap it with a lovely ribbon. Perfect to use as a gift.

What would you do with these cute hearts?

_____________________________________________________________

Liefde, lieve cadeautjes en een beetje extra aandacht aan de mensen van wie je houdt. Dat is waar Valentijnsdag over gaat.
En om je te helpen deze Valentijnsdag extra bijzonder te maken dit jaar, heb ik iets gemaakt wat denk ik door iedereen wel te gebruiken is.
Ik heb sets gemaakt van 6 gehaakte hartjes, drie 3D hartjes en 3 plattere hartjes. En vandaag zal ik 5 manieren laten zien hoe je ze kunt gebruiken.
Als je de hartjes leuk vindt, je kunt ze hier kopen. Maar je moet wel snel zijn, want er is maar 1 set van elke kleur!

Dit zijn de 5 ideeen hoe je je geliefde (of jezelf) kunt verrassen met deze schattige hartjes:
1. Gebruik de hartjes als decoratie in je huis. Erg leuk te combineren met kaarsjes of bloemen. Succes gegarandeerd!
2. Maak je eigen Valentijnskaart en plak er een hartje op. Dit kan heel makkelijk met gewone hobbylijm of met secondelijm.
3. Geef de hartjes weg, aan je moeder en je beste vriendin. Of stop 'm stiekem in de jaszak van je geheime liefde!
4. Zet een spoor uit met de hartjes en laat je geliefde die volgen. En aan het einde sta jij natuurlijk met een mooie roos te wachten. Ik weet zeker dat je ware liefde glunderend op je af zal komen lopen.
5. Doe een hartje aan een kettinkje, stop 'm in een doosje en doe er een mooi lint omheen. Een perfect cadeautje.

Wat zou jij doen met deze leuke hartjes?


Thursday, October 30, 2014

Top 7 Best Autumn DIY's of This Year

Are you looking for some inspiration to 'autumnify' your home this season?
And do you enjoy handmade home decoration?
Than I've got the perfect inspiration list here for you.
Click the links below the image and you'll be redirected to the instructions. Some instructions are only in Dutch, but most of the time you can also make the item from the pictures provided.


1. Pom Pom Hedgehogs from Molly Moo Crafts
2. Crochet Pumnpkin by Ravelien
3. Crochet Maple Leafs by Craft Craft
4. Crochet Mushrooms by Grietje Karwietje
5. Candle Holder from real leafs by Spark and Chemistry
6. Crochet Acorns by Engsidrun
7. Bowl from real leafs by Hello Lucky

Happy DIYing!

P.S: There's many new items in the JCLN Etsy shop, so come and take a look.
And as a bonus: if you've never bought anything from Etsy yet, you can use this link to get 5 euro's discount! The discount can be used in all Etsy shops and ofcourse you can share the link with family & friends!

_______________________________________________________

Ben je op zoek naar inspiratie om je huis lekker herfstig te maken?
En houd je van handgemaakte woondecoratie?
Dan heb ik hier de perfecte inspiratie-lijst voor jou!
Klik op de links onder het plaatje en je wordt gelijk doorverwezen naar de uitleg. Mocht Engels niet je grootste talent zijn: er zitten ook Nederlandse sites tussen en vanaf de plaatjes kun je de items vaak ook wel maken.

Succes en veel plezier!

P.S.: Er zijn weer veel nieuwe items in de JCLN Etsy shop, kom je kijken?!
En als bonus: als je nog nooit wat op Etsy gekocht hebt, gebruik dan deze link en krijg 5 euro korting! De korting geldt bij alle Etsy shops en je kunt de link natuurlijk ook delen met vrienden en familie!

Thursday, September 18, 2014

Inspiration for your handmade wedding


Hey lovely "Stuff to Love" blog readers ;-). I am Rasa from Friendly Nettle and today I will be sharing all about my crafty handmade wedding I had few months ago (can't believe it has been two months already!!). I am like Jacolien, I love making everything handmade to give that extra personal touch and save some money too! This is why I got really excited when I got invited to guest post on this blog.


It all started with the theme and it was marigolds. But I wasn't crazy with marigolds (although people around me did think I am having a marigold fever), I actually loved the contrast between vibrant marigolds and muted main colours. That's just part of my personality! So our wedding colours were: grey, navy, forest green, touch of ivory and... whatever marigold brings (yellow, orange and burgundy). Once your theme and colours are set, everything will follow.

1. INVITES were done by my best friend Vicki (if you were reading my blog, you would have seen I have written so much how amazing she is). I had a design in my head, but only Vicki has the skills to translate it on to the paper. I think I would need lot's of practice to get to that stage!
So, all I did was scanned in her painting (background and flowers separately), combined everything, touched up few blemishes, put up an amazing font that I found online and there we are, it's that simple! Once printed, it was quite simple to assemble, the invites were sent in a day! Just do not forget to include RSVP card (make sure you ask for dietary requirements there) and a gift list details (people will want to bless you, so I think least you can do is help). We tied everything in to the bundle with the cotton yarn, but this is not a must, we just thought it would look pretty!


2. The DRESS. Although that wasn't my focus, I did purchase it first! I bought it from a charity shop with the help from my new sister in law, Nicola (she was so helpful!) and fixed it up. My whole outfit ended up costing me only £156.09! Read on here on how I did that ;-).


3. MY SHOES were also slightly edited. I found a basic grey (main wedding colour) suede court shoes that I still wear today and pinned a ribbon flower brooch on it that I made myself! Check it out, very cool project to do if you are looking for a simple accessory not only for shoes ;-). 


4. The BRIDESMAID DRESSES were inspired by this pic that I once came across in this blog post with the advice for a Maid Of Honour (sadly can't find it anymore). This pic had all the bridesmaids in the group all dressed in different summer dresses. So what I did was I designed and made two simple dresses in light fabric using two of the main colours (those were two of my projects: Nicola Dress and Wrap Dress).  Anna had her own dress, so I only needed to extend it's length (click here to learn how) to make it match with the other dresses. The great thing is that everything together costed only £59.92! Ok, I did spend some time, but it was worth it as it was all custom made :-).


5. CONFETTI, quite many people forget this! I think this is essential when making dramatic photos when you exit the church. You can even match it to your wedding colours! I even made confetti cone crate to encourage everybody to participate in confetti throwing. Many relatives were also very happy to help with the flower drying marathon! So, yes, really worth making this.


6. SEATING CHART DESIGN. When it comes to big events this is essential, otherwise we would have plenty of confused guests looking where they are supposed to sit. We decided to make ours look like part of the decoration. Click here to see how I made it in detail.


7. FAVOURS can serve a double duty. Marigold pots, that I painted as well, were part of decoration as well as little gifts to the guest. I posted once on my blog how I paint my own terracotta pots to make them custom made. By now the majority of my plants are potted in uniquely decorated pots!


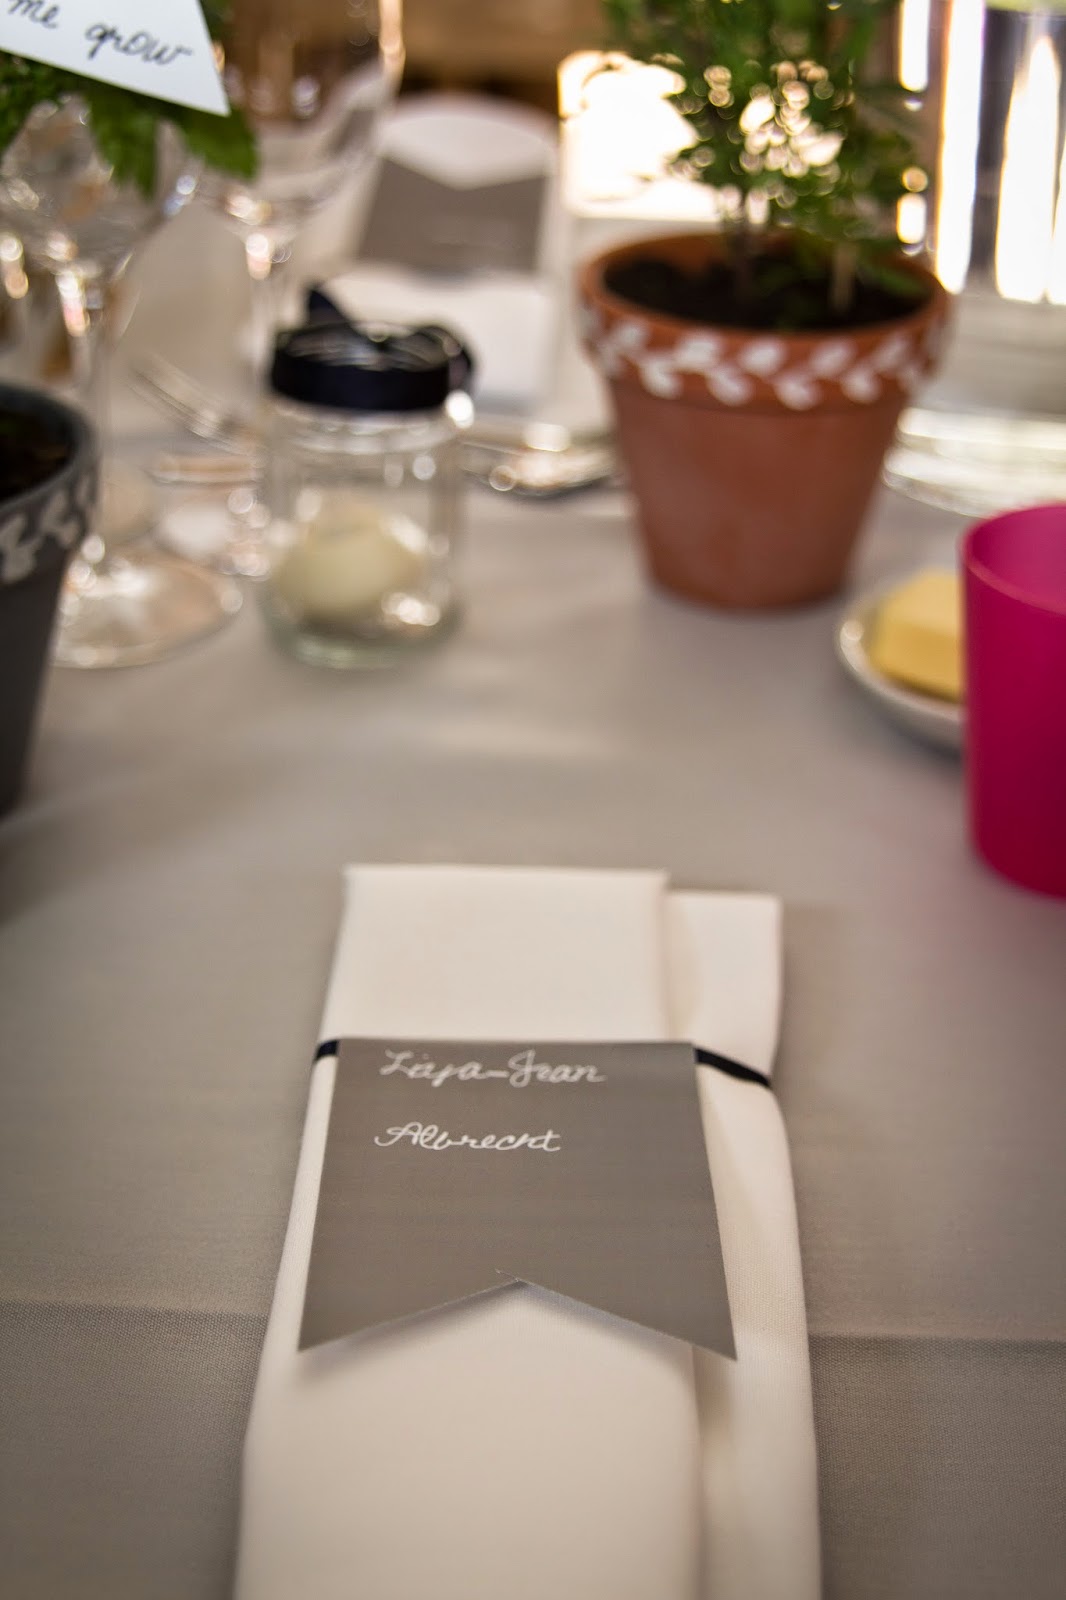
8. TABLE SETTING. I actually made up a mock up table setting on how I wanted the tables to look like. This has been quite useful, not only for myself to see a bigger picture but also for others involved on the day. Our table setting included light grey table linen, name flags wrapped around each napkin (matching seating chart design), candles in the navy ribbon jars, marigold pots, table numbers (matching original invite) and not forgetting the essentials such as plates, wine glasses, knife and forks.


9. The WEDDING CAKE was baked by a family friend, Kathryn. I am a really big fan of so called 'naked' cakes. This is because I prefer a natural look, rather then overdecorated heavily iced cakes. We were lucky to be able to use our wedding flowers on the cake, because marigolds are actually edible! I am really pleased with the result!


10. ENTERTAINMENT is last, but not least. As soon as we got engaged I have decided to hire Ceilidh band, this is what made me choose a barn for the venue! License to Ceilidh were actually a band that we had on on our first date!


Other than evening entertainment, we involved our guests into meat carving. We got aprons and the hats to make our VIP guests feel extra special and they got to keep their outfit too!


When it comes to outdoor games, we really wanted those giant board games that I have seen in some weddings. But after thinking outside the box we decided to ask everybody to bring their own board games. This was really fun and did not cost us a penny!


I hope you enjoyed and feel inspired by my post, be sure to visit me sometimes at Friendly Nettle!

________________________________________________________________

Hey leuke “Stuff to Love” bloglezers ;-). Ik ben Rasa van Friendly Nettle en vandaag vertel ik in deze blogpost over mijn crafty handmade trouwdag van een paar maanden geleden (ik kan niet geloven dat dat alweer twee maanden geleden was!!). Ik ben, net als Jacolien, een liefhebber van handgemaakt om dingen zo een persoonlijke touch te geven en om ook geld te besparen! Daarom was ik ook super enthousiast toen ik werd uitgenodigd om een gastblog te verzorgen hier.

De bruiloft begon allemaal me het thema en dat was goudsbloemen. Ik ben niet persé helemaal gek van goudsbloemen (al denken mensen om me heen nu dat ik een goudsbloemen koorts heb), maar ik vind vooral het contrast tussen de levendige goudsbloem en gedempte basiskleuren. Dat is gewoon onderdeel van wie ik ben! Dus de kleuren voor onze trouwdag waren: grijs, navy, bosgroen, ivoor en… welke kleur goudsbloemen ook hebben (geel, oranje en bordeaux). Zodra je een thema en kleuren hebt gekozen, zal de rest vanzelf wel volgen.


1.        De UITNODIGINGEN waren door mijn beste vriendin Vicky gemaakt (als je mijn blog leest, zul je al veel gelezen hebben over hoe super zij is). Ik had een ontwerp in mijn hoofd en alleen Vicky had de skills om dat op papier te vertalen. Ik denk dat ik veel oefening nodig zal hebben om dat zelf te kunnen!
Alles wat ik zelf gedaan heb is de tekening ingescand (de achtergrond en bloemen apart), alles samengevoegd, wat details aangepast, online een mooi lettertype opgezocht en dat was het, zo simpel is het! Eenmaal geprint hebben we ze heel simpel samengevoegd, binnen een dag waren alle uitnodigingen op de bus! Vergeet niet om een RSVP kaartje bij te voegen (vraag hierop ook om dieet wensen) en een cadeaulijst (mensen willen je graag feliciteren, dus waarom zou je ze niet helpen met een mooie cadeaulijst?). We hebben alles met een katoenen draadje bij elkaar gebonden, maar dat is natuurlijk niet verplicht. We vonden het gewoon mooi staan!

2.        De TROUWJURK was niet mijn eerste prioriteit, maar die had ik wel als eerste aangeschaft. Ik kocht hem in een liefdadigheidswinkel samen met mijn nieuwe schoonzus, Nicola (zij was enorm behulpzaam) en heb wat aanpassingen aan de jurk gemaakt. Mijn hele outfit kostte uiteindelijk maar £156.09! Lees hier hoe ik dat deed. ;-)

3.        Mijn SCHOENEN waren ook ietsjes aangepast. Ik vond een simpele grijze (basiskleur van de trouwdag) suede schoen die ik nu nog steeds draag. Ik heb er een bloemen broche van lint op geklipt die ik zelf gemaakt had! Via de link kom je bij een uitleg om ‘m zelf te maken, een simpel te maken accessoire voor allerlei dingen te gebruiken . ;-)

4.        De JURKEN van de BRUIDSMEISJES waren geïnspireerd op een foto in en blogpost met advies voor bruidsmeisjes (helaas kan ik ‘m niet meer vinden). Op de foto stonden allemaal bruidsmeisjes met verschillende zomerjurkjes aan. Dus ik heb zelf een ontwerp gemaakt en heb twee simpele jurkjes gemaakt van een lichte stof in twee van de basiskleuren van de trouwdag. Je vindt de twee projecten hier: Nicola Dress en Wrap Dress.  Anna had haar eigen jurk, die moest alleen qua lengte wat aangepast worden (klik hier om te leren hoe je dat doet). En het allerbeste is dat alles bij elkaar maar £59.92 kostte! Ok, het kost wat tijd om alles helemaal op maat te maken, maar het was het waard.

5.        De CONFETTI, veel mensen vergeten dit! Ik denk dat het essentieel is als je mooie, bijzondere foto’s wilt maken als je de kerk uitloopt. Je kunt ze zelfs in de kleuren van je trouwdag maken. Ik heb er zelfs confetti-hoorn kratje bijgemaakt om iedereen aan te moedigen om mee te doen met het confetti-gooien. Veel familieleden waren ook zeer behulpzaam bij het drogen van de bloemblaadjes! Dus ja, het was echt de moeite waard om dit te maken.

6.        TAFELINDELING. Bij grote evenementen is dit essentieel, anders riskeer je veel verward ogende gasten die op zoek zijn naar hun zitplaats. We besloten om de tafelindeling onderdeel te maken van de decoratie. Klik hier om in detail te zien hoe ik dit gemaakt heb.

7.         EXTRAATJES kunnen een dubbele functie vervullen. Potjes met goudsbloemen maakten onderdeel uit van de decoratie, maar waren ook kleine cadeautjes voor de gasten. Ik heb ooit op m’n blog verteld hoe ik terracotta potjes heb geverfd om ze zo helemaal op maat te maken. Inmiddels hebben de meeste van mijn planten een uniek gedecoreerde pot!

8.        TAFELDECORATIE. Ik heb eigenlijk gewoon een model gemaakt van hoe ik wilde dat de tafels eruit zouden zien. Dit was erg handig voor mijzelf om het grotere plaatje te zien, maar ook voor de anderen die betrokken waren bij de dag. Onze tafeldecoratie bestond uit lichtgrijs tafellinnen, naamvlaggetjes die om de servetten gevouwen waren (en weer combineerden met de tafelindeling), kaarsjes in potjes met een navy gekleurd lint, postjes goudsbloemen, tafelnummers (die qua design met de uitnodigingen matchten) en niet te vergeten de borden, wijnglazen, messen en vorken.

9.        De BRUIDSTAART is gebakken door een vriendin van de familie, Kathryn. Ik ben een groot fan van zogeheten ‘naakte’ taarten. Dit omdat ik de natuurlijke look zo mooi vind, veel beter dan taarten vol met decoratie en poespas. En het was natuurlijk helemaal leuk dat we de trouwbloemen in de taart konden verwerken, omdat goudbloemen gewoon eetbaar zijn! Ik ben zeer tevreden met het resultaat!

10.    ENTERTAINMENT is last, but not least. Zodra we ons verloofd hadden besloten we om een Ceilidh band te huren,  en daardoor kozen we ook een oude boerderij als feestlocatie. License to Ceilidh was trouwens ook de band waar we tijdens onze eerste date naar luisterden!
Naast de avondentertainment, betrokken we onze gasten ook bij het aansnijden van het vlees. We hadden schorten en koksmutsen gekocht voor onze VIP gasten, zodat zij zich extra speciaal voelden en ze mochten de outfit ook nog houden!
En voor de spellen buiten, wilden we eigenlijk zo’n gigantisch bordspel huren die we bij een andere bruiloft hadden gezien. Maar nadat we even buiten het kader dachten, besloten we om iedereen te vragen zijn eigen bordspellen mee te nemen. Dit was erg leuk en het kostte ons geen cent!

Ik hoop dat je het leuk vond en dat je geïnspireerd bent door mijn post. Kom gerust eens een kijkje nemen bij Friendly Nettle!


Related Posts Plugin for WordPress, Blogger...

Like this blog? Sign up for the free JCLN Newsletter!

Pin It button on image hover